Від простого до складного, перед вами друга частина з серії статей про розробку ботів до Google чату.
Сьогодні я буду вас вчити як вести діалог з ботом.
Тож, в цій частині, я розповім вам, як створити діалог, та що треба робити, щоб можна було відправити до спейсу картку з картинками та текстом, наприклад, якщо вам треба відправити поздоровлення до дня народження. Буде більше коду, ніж в попередній частині та я буду намагатися пояснювати та додавати посилання на офіційну документацію.
Діалоги
Почнемо знов з додавання slash-команди до нашого боту, нагадую, що для цього нам треба перейти до налаштувань Google Chat API.
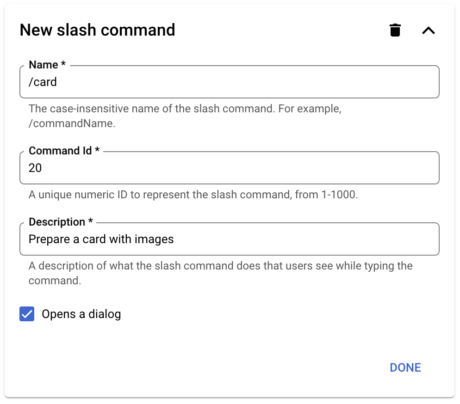
На відміну від попередніх команд які ми додавали тут вам треба поставити позначку ✅ Opens a dialog щоб далі працювати вже з діалогом.
Зміни до Code.gs теж не складні, нам треба лише піймати нову команду з ID 20:
/**
 * Responds to a MESSAGE event in Google Chat.
 *
 * @param {Object} event the event object from Google Chat
 */
function onMessage(event) {
  if (event.message.slashCommand) {
    // Checks for the presence of event.message.slashCommand
    // The ID for your slash command
    switch (event.message.slashCommand.commandId) {
      case 1:
        return slashHelp(event)
      case 10:
        return slashBender(event)
      case 11:
        return slashWhisky(event)
      case 20:
        return slashCard(event)
    }
  } else {
    // If the Chat app doesn't detect a slash command
    // ...
  }
}
Створими файл slashCard.gs з відповідною функцією:
/**
 * Opens a dialog in Google Chat.
 *
 * @param {Object} event the event object from Chat API.
 *
 * @return {object} open a Dialog in Google Chat.
 */
function slashCard (event) {
  return {
    'action_response': {
      'type': 'DIALOG',
      'dialog_action': {
        'dialog': {
          'body': {
            'sections': [
              {
                'header': 'Nice Card Builder',
                'collapsible': true,
                'uncollapsibleWidgetsCount': 2,
                'widgets': [
                  {
                    'textInput': {
                      'name': 'description',
                      'type': 'MULTIPLE_LINE',
                      'label': '📝 Description'
                    }
                  },
                  {
                    'textInput': {
                      'name': 'image_1',
                      'label': '1️⃣ Image URL',
                      'placeholderText': 'https://source.unsplash.com/featured/320x320'
                    }
                  },
                  {
                    'textInput': {
                      'name': 'image_2',
                      'label': '2️⃣'
                    }
                  },
                  {
                    'textInput': {
                      'name': 'image_3',
                      'label': '3️⃣'
                    }
                  }
                ]
              }
            ],
            'fixedFooter': {
              'primaryButton': {
                'icon': {
                  'materialIcon': {
                    'name': 'send'
                  }
                },
                'text': 'Send',
                'color': {
                  'red': 0,
                  'green': 0.5,
                  'blue': 1,
                  'alpha': 1
                },
                'onClick': {
                  'action': {
                    'function': 'receiveCard'
                  }
                }
              }
            }
          }
        }
      }
    }
  }
}
Тут окремо слід зазначити 'type': 'DIALOG', це обов’язкове, а ось все що в нас у dialog_action – то ця конструкція нам вже знайома, цей JSON можна створити за допомоги Card Builder. Можете спробувати погратися та створити свій власний діалог.
Спробуємо команду /card, отримаємо наступний діалог:
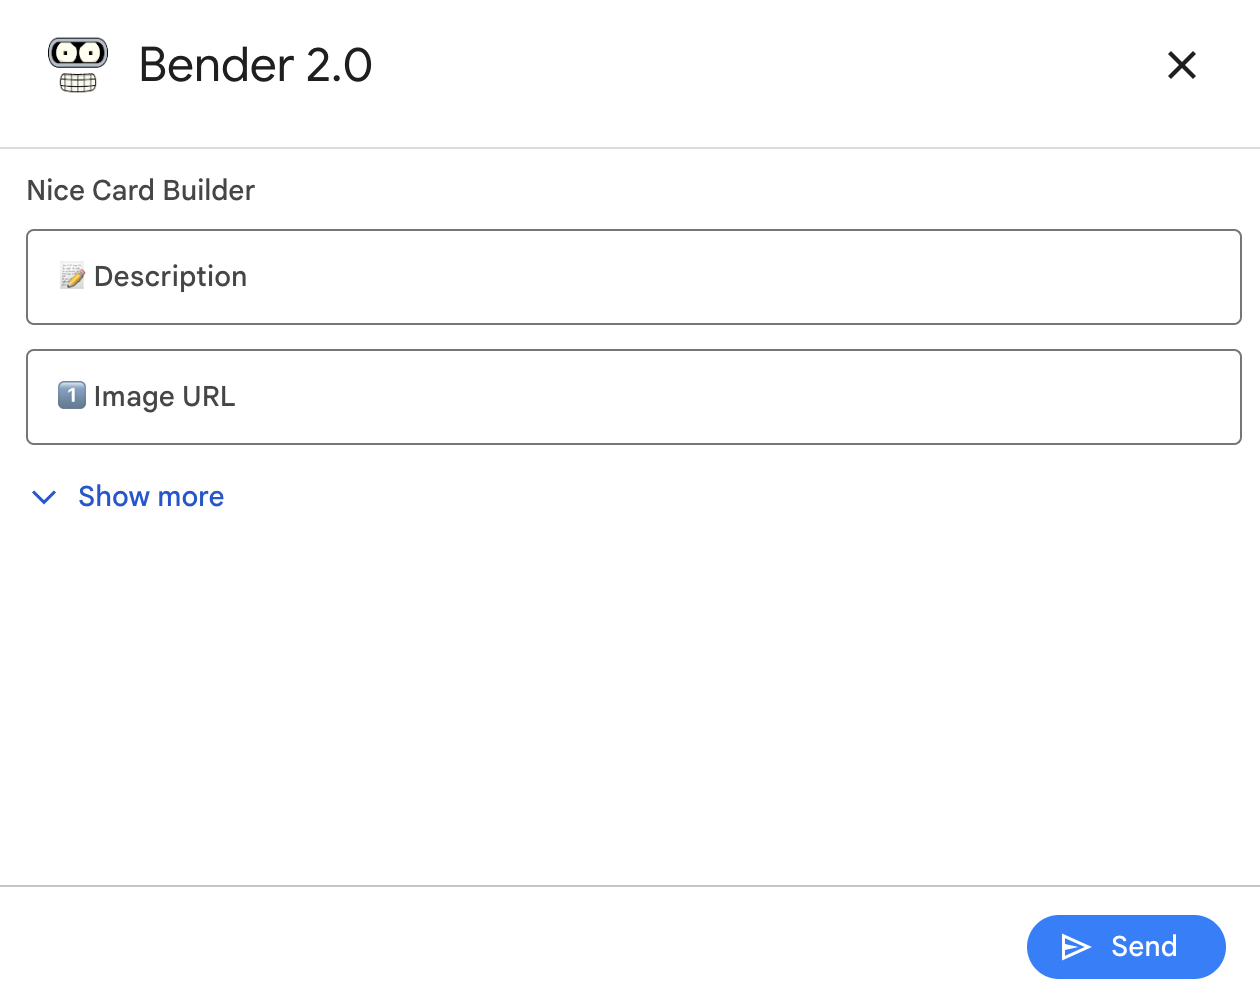
Якщо спробуємо її відправити, то нічого не відбудеться! Що в цьому випадку робити? Дебажити?
Давайте спочатку подивимось чи не з’явилось в нас помилок у Apps Script, для цього перейдіть до розділу Executions, там вас буде чекати інформація про хід виконання скриптів:
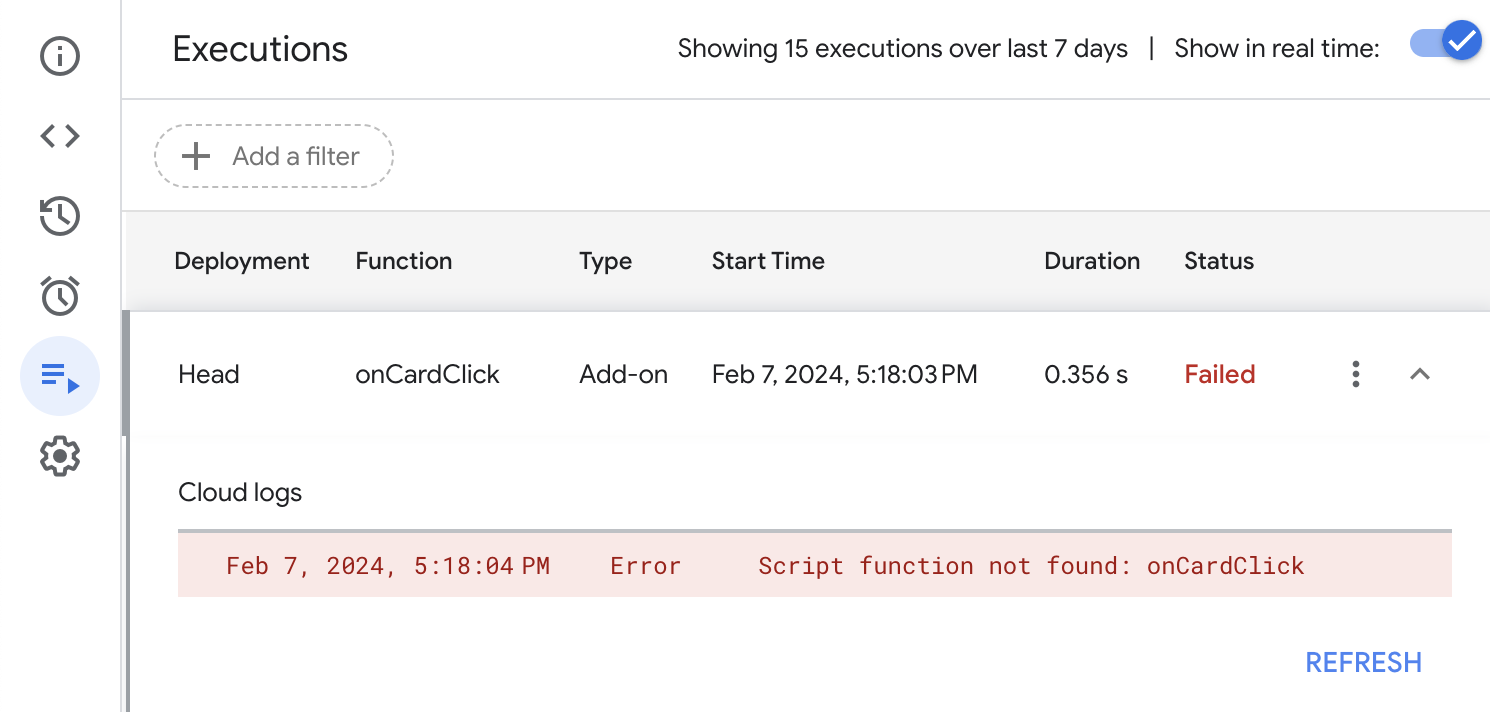
Так, і чому воно в мене питає про функцію, про яку я нічого не знаю, та ніде не використовую, що це за onCardClick?
Це така службова функція яка потрібна нам щоб обробляти якраз події типу CARD_CLICKED, тож давайте створимо відповідну функцію обробник у файлі Code.gs:
/**
 * Responds to a CARD_CLICKED event in Google Chat.
 *
 * @param {Object} event the event object from Google Chat
 */
function onCardClick (event) {
  switch (event.common.invokedFunction) {
    case 'receiveCard':
      return receiveCard(event)
  }
}
Як бачите, я тут чекаю на ім’я функції яку треба визвати, та цю назву функції receiveCard я прописав у onClick екшені попередньої форми вище, у строчці 64, тож коли відкриється діалог, та ми клікнемо по кнопці Send то ми визвемо функцію receiveCard(event) яку нам ще треба написати. Давайте поступово, почнемо з пустої функції:
/**
 * @param {Object} event the event object from Google Chat
 */
function receiveCard (event) {
  console.log(event)
}
Коли ми використовуємо console.log, то результат ми зможемо знайти на сторінці Executions, давайте подивимось що зараз ми отримаємо коли спробуємо знову відправити форму (якщо у вас нічого не з’явилось відразу, попробуйте потицкати кнопку Refresh, поки не отримаєте результат):
{
  type: 'CARD_CLICKED',
  common:
   { formInputs:
      { image_3: [Object],
        image_2: [Object],
        image_5: [Object],
        image_1: [Object],
        image_4: [Object],
        description: [Object] },
     timeZone: { id: 'Europe/Kyiv', offset: 3600000 },
     userLocale: 'en-US',
     hostApp: 'CHAT',
     invokedFunction: 'receiveCard' },
  isDialogEvent: true,
  message:
   { annotations: [ [Object] ],
     createTime: { seconds: 1707324122, nanos: 333183000 },
     retentionSettings: { state: 'PERMANENT' },
     thread:
      { retentionSettings: [Object],
        name: 'spaces/.../threads/...' },
     name: 'spaces/.../messages/.......',
     messageHistoryState: 'HISTORY_ON',
     text: '/card',
     space:
      { singleUserBotDm: true,
        spaceThreadingState: 'UNTHREADED_MESSAGES',
        name: 'spaces/...',
        spaceType: 'DIRECT_MESSAGE',
        type: 'DM',
        spaceHistoryState: 'HISTORY_ON' },
     formattedText: '/card',
     sender:
      { displayName: 'Anton Shevchuk',
        avatarUrl: '...',
        type: 'HUMAN',
        domainId: '...',
        email: '...',
        name: 'users/...' },
     slashCommand: { commandId: 20 } },
  eventTime: { nanos: 716454000, seconds: 1707324126 },
  configCompleteRedirectUrl: '...',
  space:
   { type: 'DM',
     spaceThreadingState: 'UNTHREADED_MESSAGES',
     spaceType: 'DIRECT_MESSAGE',
     name: 'spaces/...',
     singleUserBotDm: true,
     spaceHistoryState: 'HISTORY_ON' },
  dialogEventType: 'SUBMIT_DIALOG',
  user:
   { email: '...',
     domainId: '...',
     type: 'HUMAN',
     name: 'users/...',
     displayName: 'Anton Shevchuk',
     avatarUrl: '...' },
  action: { actionMethodName: 'receiveCard' }
}
Ми отримуємо досить багато інформації, але нас цікавить саме інформація з полів, які ми дали заповнити користувачу, а за це відповідає event.common.formInputs, загляніть самостійно як виглядає формат цих даних, як на мене він трохи дивний, але най буде.
Щоб зручніше працювати з даними з форми я створив ось такий помічник, цу лістинг файлу FormInputHandler.gs:
class FormInputHandler {
  constructor(event) {
    // Check if formInputs exist in the event structure
    if (event.common && event.common.formInputs) {
      this.formInputs = event.common.formInputs;
      this.isValid = true; // Mark as valid if formInputs are found
    } else {
      // Handle the invalid case
      this.isValid = false;
      console.log('Invalid event: formInputs not found.');
      // Depending on your application, you might throw an error or handle this case differently
    }
  }

  // Method to check if the handler instance is valid
  isValidHandler() {
    return this.isValid;
  }

  // Retrieve a text input value by field name, adjusted for the specific structure
  getTextValue(fieldName) {
    if (this.isValid && this.formInputs[fieldName] &&
        this.formInputs[fieldName][''] &&
        this.formInputs[fieldName][''].stringInputs &&
        this.formInputs[fieldName][''].stringInputs.value) {
      return this.formInputs[fieldName][''].stringInputs.value[0];
    }
    return null;
  }

  // Additional methods to handle other types of inputs can be added here
  // ...
}
Ось приклад як ним можна користуватися:
/**
 * @param {Object} event the event object from Google Chat
 */
function receiveCard (event) {
  const formHandler = new FormInputHandler(event)

  if (!formHandler.isValidHandler()) {
    console.log('Invalid event: formInputs not found.')
    return
  }

  console.log(
    formHandler.getTextValue('description')
  )
}
Давайте спробуємо обробити запит з картки та створити щось цікавіше, ніж функціонал slashBender() (це те що ми реалізовували у попередньому уроці).
Валідація
Перевіремо, що ми отримали текст з поля Description, та якщо ні, то повернемо текст помилки:
  let description = formHandler.getTextValue('description')

  if (!description || description.trim() === '') {
    return {
      'actionResponse': {
        'type': 'DIALOG',
        'dialogAction': {
          'actionStatus': {
            'statusCode': 'INVALID_ARGUMENT',
            'userFacingMessage': 'You should write the description'
          }
        }
      }
    }
  }
На мій погляд виглядає досить крінжово, тому я знов таки вирішив трохи погратися в передчасну оптимізацію кода, перед вами файл Response.gs:
/**
 * The canonical error codes for gRPC APIs.
 *
 * @link https://developers.google.com/chat/api/reference/rest/v1/spaces.messages#code
 */
// Not an error; returned on success.
// HTTP Mapping: 200 OK
const CODE_OK = 'OK'
// The client specified an invalid argument.
// INVALID_ARGUMENT indicates arguments that are problematic regardless of the state of the system (e.g., a malformed file name).
// HTTP Mapping: 400 Bad Request
const CODE_INVALID_ARGUMENT = 'INVALID_ARGUMENT'

/**
 * The type of Chat app response
 *
 * @link https://developers.google.com/chat/api/reference/rest/v1/spaces.messages#responsetype
 */
// Post as a new message in the topic
const RESPONSE_TYPE_NEW_MESSAGE = 'NEW_MESSAGE'
// Update the message
const RESPONSE_TYPE_UPDATE_MESSAGE = 'UPDATE_MESSAGE'
// Update the cards on message of user
const RESPONSE_TYPE_UPDATE_USER_MESSAGE_CARDS = 'UPDATE_USER_MESSAGE_CARDS'
// Privately ask the user for additional authentication or configuration.
const RESPONSE_TYPE_REQUEST_CONFIG = 'REQUEST_CONFIG'
// Presents a dialog
const RESPONSE_TYPE_DIALOG = 'DIALOG'
// Widget text autocomplete options query
const RESPONSE_TYPE_UPDATE_WIDGET = 'UPDATE_WIDGET'

function actionResponse(type = RESPONSE_TYPE_DIALOG, statusCode = CODE_OK, message = '') {
  return {
    'actionResponse': {
      'type': type,
      'dialogAction': {
        'actionStatus': {
          'statusCode': statusCode,
          'userFacingMessage': message
        }
      }
    }
  }
}

/**
 * Card Helper
 *  - When all OK, status code
 */
function OK () {
  return actionResponse(RESPONSE_TYPE_DIALOG, CODE_OK, '👌')
}

/**
 * Card Helper
 *  - When argument is invalid
 */
function INVALID_ARGUMENT (message) {
  return actionResponse(RESPONSE_TYPE_DIALOG, CODE_INVALID_ARGUMENT, message)
}
Насправді ви ж розумієте, що це вже версія бота 2.0, тож всі граблі я вже зібрав у попередній версії 😅
Тож попередній приклад трохи змінемо, ось так він буде виглядати:
/**
 * @param {Object} event the event object from Google Chat
 */
function receiveCard (event) {
  const formHandler = new FormInputHandler(event)

  if (!formHandler.isValidHandler()) {
    console.log('Invalid event: formInputs not found.')
    return
  }

  let description = formHandler.getTextValue('description')

  if (!description || description.trim() === '') {
    return INVALID_ARGUMENT('You should write the description')
  }

  // ...
}
Якщо на цьому етапі спробувати відправити пусту форму, то отримаємо ось таке повідомлення:

Якщо дані заповнити, то отримаємо ось таке повідомлення, бо ще немає валідної відповіді від нашої функції:

Над цим і будемо працювати далі.
Ви нам форму, ми вам картку
Тож, якщо повернутися до нашого діалогу, то ви там побачите 4 поля, перше – це текстове поле на кілька рядків, та 3 поля в які, за моїм задумом, треба вставляти посилання на світлини. Давайте всю цю інформацію обробимо та сформуємо картку у відповідь:
/**
 * @param {Object} event the event object from Google Chat
 */
function receiveCard(event) {
  const formHandler = new FormInputHandler(event)

  if (!formHandler.isValidHandler()) {
    console.log('Invalid event: formInputs not found.')
    return
  }

  let description = formHandler.getTextValue('description')

  if (!description || description.trim() === '') {
    return INVALID_ARGUMENT('You should write the description')
  }

  let images = [
    formHandler.getTextValue('image_1'),
    formHandler.getTextValue('image_2'),
    formHandler.getTextValue('image_3')
  ]

  images = images.filter(n => n)

  let widgets = []

  while (images.length) {
    widgets.push({
      'image': {
        'imageUrl': images.shift(),
        'altText': ''
      }
    })
  }

  widgets.push(
    {
      'textParagraph': {
        'text': description
      }
    }
  )

  return {
    'actionResponse': {
      'type': RESPONSE_TYPE_NEW_MESSAGE,
    },
    'cardsV2': [
      {
        'cardId': 'niceCard',
        'card': {
          'sections': [
            {
              'collapsible': false,
              'widgets': widgets
            }
          ]
        }
      }
    ]
  }
}
У цьому вигляді ваш бот зможе вже створювати картку з однією світлиною:

Мені тут не дуже подобається оце створення віджетів у такий спосіб, мені краще програмний спосіб, але на жаль я не знайшов такої можливості тому створив файл Widgets.gs та почав наповнювати його функціоналом:
/**
 * @link https://developers.google.com/chat/api/reference/rest/v1/cards#TextParagraph_1
 */
function widgetTextParagraph(text) {
  return {
    'textParagraph': {
      'text': text
    }
  }
}

/**
 * @link https://developers.google.com/chat/api/reference/rest/v1/cards#image
 */
function widgetImage(url, alt = '') {
  return {
    'image': {
      'imageUrl': url,
      'altText': alt
    }
  }
}
Тепер виглядає краще:
  let widgets = []

  while (images.length) {
    widgets.push(
      widgetImage(images.shift())
    )
  }

  widgets.push(
    widgetTextParagraph(description)
  )
А потім я ще трохи розширив функціонал, додав підтримку до 5-ти картинок, та формую grid, щоб красиво це виводити. Щоб у коді не було безладу, то я додав ще один клас у файлі
Grid.gs, але то буде вже домашнє завдання подивитися його код та зрозуміти що там відбувається.
Source Code
Код бота доступний на GitHub, реліз 2.0.0 відповідає коду з цієї статті.

One thought on “Google Chat Bot. Створюємо діалог”