Настав час продовжити розробку бота для Google Chat. Цього разу, ми навчимо його створювати голосування, це той функціонал якого дуже не вистачає при постійній комунікації у робочому спейсі. Для реалізації нам треба буде розібратися як взаємодіяти та оновлювати картку у чаті.
Діалог
Почнемо знов з додавання slash-команди до нашого боту, нагадую, що для цього нам треба перейти до налаштувань Google Chat API.
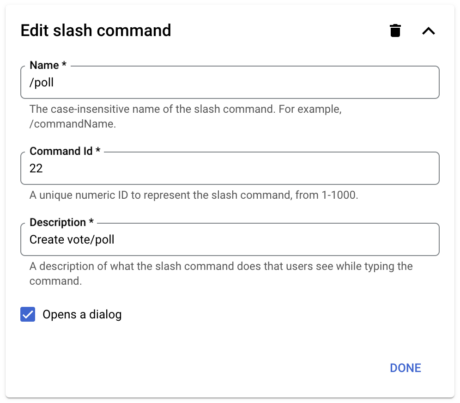
Ми вже створювали діалоги, тож не забудьте поставити позначку ✅ Opens a dialog.
Зміни до Code.gs теж не складні, нам треба лише піймати нову команду з ID 22:
/**
 * Responds to a MESSAGE event in Google Chat.
 *
 * @param {Object} event the event object from Google Chat
 */
function onMessage(event) {
  if (event.message.slashCommand) {
    // Checks for the presence of event.message.slashCommand
    // The ID for your slash command
    switch (event.message.slashCommand.commandId) {
      case 1:
        return slashHelp(event)
      case 10:
        return slashBender(event)
      case 11:
        return slashWhisky(event)
      case 20:
        return slashCard(event)
      case 21:
        return slashNotes(event)
      case 22:
        return slashPoll(event)
    }
  } else {
    // If the Chat app doesn't detect a slash command
    // ...
  }
}
Створимо функцію slashPoll() у відповідному файлі:
/**
 * Opens a dialog in Google Chat.
 *
 * @param {Object} event the event object from Chat API.
 *
 * @return {object} open a Dialog in Google Chat.
 */
function slashPoll(event) {
  // nothing for now
  return dialogPoll(event)
}
Тут в нас буде лише виклик dialogPoll(), так зроблено для подальшого розширення функціоналу, наразі у dialogPoll.gs буде лише створення діалогу:
/**
 * Opens a dialog in Google Chat.
 *
 * @param {Object} event the event object from Chat API.
 *
 * @return {object} open a Dialog in Google Chat.
 */
function dialogPoll(event) {
  return {
    "action_response": {
      "type": "DIALOG",
      "dialog_action": {
        "dialog": {
          "body": {
            "sections": [
              {
                "header": "Create New Poll",
                "collapsible": true,
                "uncollapsibleWidgetsCount": 4,
                "widgets": [
                  {
                    "textParagraph": {
                      "text": "Enter the poll topic and up to 10 choices in the poll. Blank options will be omitted."
                    }
                  },
                  {
                    "textInput": {
                      "name": "question",
                      "label": "Ask a question*",
                    }
                  },
                  {
                    "textInput": {
                      "name": "option1",
                      "label": "1️⃣ Option*",
                    }
                  },
                  {
                    "textInput": {
                      "name": "option2",
                      "label": "2️⃣ Option*",
                    }
                  },
                  /* Options 3, 4, 5 .. 9 */
                  {
                    "textInput": {
                      "name": "option10",
                      "label": " Option",
                    }
                  }
                ]
              },
              {
                "header": "Options",
                "collapsible": false,
                "widgets": [
                  {
                    "decoratedText": {
                      "text": "Multiple Answers",
                      "bottomLabel": "If this checked the voters can choose more than option",
                      "switchControl": {
                        "name": "multi",
                        "selected": true,
                        "controlType": "SWITCH"
                      }
                    }
                  }
                ]
              }
            ],
            "fixedFooter": {
              "primaryButton": {
                "icon": {
                  "materialIcon": {
                    "name": "send"
                  }
                },
                "text": "Send",
                "onClick": {
                  "action": {
                    "function": "actionNewPoll"
                  }
                }
              }
            }
          }
        }
      }
    }
  }
}
Нагадую, що для створення діалогів та карток зручно використовувати сервіс Card Builder
Після цього ви вже можете користуватися командою /poll, та навіть зможете отримати наступний діалог:
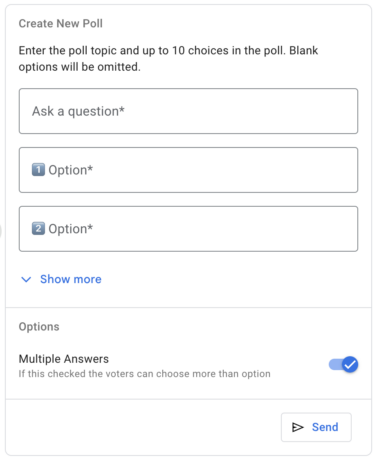
Тепер слід додати обробку onclick-функції з попереднього лістингу кода, для цього внесіть зміни до onCardClick(event):
/**
 * Responds to a CARD_CLICKED event in Google Chat.
 *
 * @param {Object} event the event object from Google Chat
 */
function onCardClick(event) {
  switch (event.common.invokedFunction) {

    //
    // ... the code was cropped
    //

    // - /poll
    case 'actionNewPoll':
      return actionNewPoll(event)
  }
}
Знов створимо нову функцію actionNewPoll() у новому файлі actionNewPoll.gs:
/**
 * @param {Object} event the event object from Google Chat
 */
function actionNewPoll(event) {

  const formHandler = new FormInputHandler(event)

  formHandler.getTextValue('question')
  formHandler.getBooleanValue('multi')
  formHandler.getTextValue('option1')
  // ...
  formHandler.getTextValue('option10')

  //
  // ... the code was cropped
  //

}
Тут трохи треба призупинитися, та нагадати, що клас
FormInputHandlerми створювали раніше, та він відповідає за отримання даних з форми, а зараз ми лише додали новий методgetBooleanValue(), та я гадаю з ним не виникне непорозумінь.
Але я не просто хочу отримати дані, я хочу зробити валідацію, щоб можна було внести зміни у форму у випадку, якщо виникла помилка.
Для цього я додам декілька перевірок, і у випадку невдачі буду повертати попередню форму з текстом помилки:
/**
 * @param {Object} event the event object from Google Chat
 */
function actionNewPoll(event) {

  const formHandler = new FormInputHandler(event)

  let data = {
    question: formHandler.getTextValue('question'),
    multi: formHandler.getBooleanValue('multi'),
    options: []
  }

  for (let i = 1; i <= 10; i++) {
    let option = formHandler.getTextValue(`option${i}`)
    if (option.length) {
      data.options.push(option)
    }
  }

  if (!data.question.length) {
    return dialogPoll(event, data)
  }

  if (data.options.length < 2) {
    return dialogPoll(event, data)
  }

  //
  // ... the code was cropped
  //

}
У цьомі коді я формую об’єкт data, щоб було зручніше працювати з даними з форми, та роблю усього дві перевірки — що в нас є питання і що варіантів відповідей не менше двох. Коли виникає помилка я повертаю знов діалог, який ми додали до функції dialogPoll(). Нам лише треба внести зміни, щоб на формі зберігались попередньо внесені дані та відображався текст помилки:
/**
 * Opens a dialog in Google Chat.
 *
 * @param {Object} event the event object from Chat API.
 * @param {Object} data the data from a form.
 *
 * @return {object} open a Dialog in Google Chat.
 */
function dialogPoll(event, data = null) {

  let card = {
    'action_response': {
      'type': 'DIALOG',
      'dialog_action': {
        'dialog': {
          'body': {
            'sections': [
              {
                'header': 'Create New Poll',
                'collapsible': true,
                'uncollapsibleWidgetsCount': 4,
                'widgets': [
                  {
                    "textParagraph": {
                      "text": "Enter the poll topic and up to 10 choices in the poll. Blank options will be omitted."
                    }
                  },
                  {
                    'textInput': {
                      'name': 'question',
                      'label': 'Ask a question*',
                      'value': data && data.question ? data.question : ''
                    }
                  },
                  {
                    'textInput': {
                      'name': 'option1',
                      'label': '1️⃣ Option*',
                      'value': data && data.options && data.options[0] ? data.options[0] : ''
                    }
                  }
                  /* Options 2, 3, 4, 5 .. 10 */
                ]
              },
              {
                "header": "Options",
                "collapsible": false,
                "widgets": [
                  {
                    "decoratedText": {
                      "text": "Multiple Answers",
                      "bottomLabel": "If this checked the voters can choose more than option",
                      "switchControl": {
                        "name": "multi",
                        "selected": (data && data.multi) ? data.multi : true,
                        "controlType": "SWITCH"
                      }
                    }
                  }
                ]
              }
            ],
            'fixedFooter': { /* ... */ }
          }
        }
      }
    }
  }

  if (data) {
    let section = {
      'widgets': [
        {
          "textParagraph": {
            "text": "<b><font color='#ff0000'>Please fill in all required data, including the question and two or more options.</font></b>"
          }
        }
      ]
    }

    card.action_response.dialog_action.dialog.body.sections.unshift(section)
  }

  return card;
}
У такий спосіб ми повернемо користувачу форму редагування голосування, та не загубимо його дані (зверніть увагу на рядки 9,32,39 та 55). Для більшої інформативності додаємо текст помилки, щоб користувач не розгубився, що наразі відбувається (рядок 81).
Картка для голосування
Перевірки всі зроблені, настав час створити картку для голосування та відправити її до чату. Відразу продемонструю дизайн картки, і потім приведу відповідний код до неї:
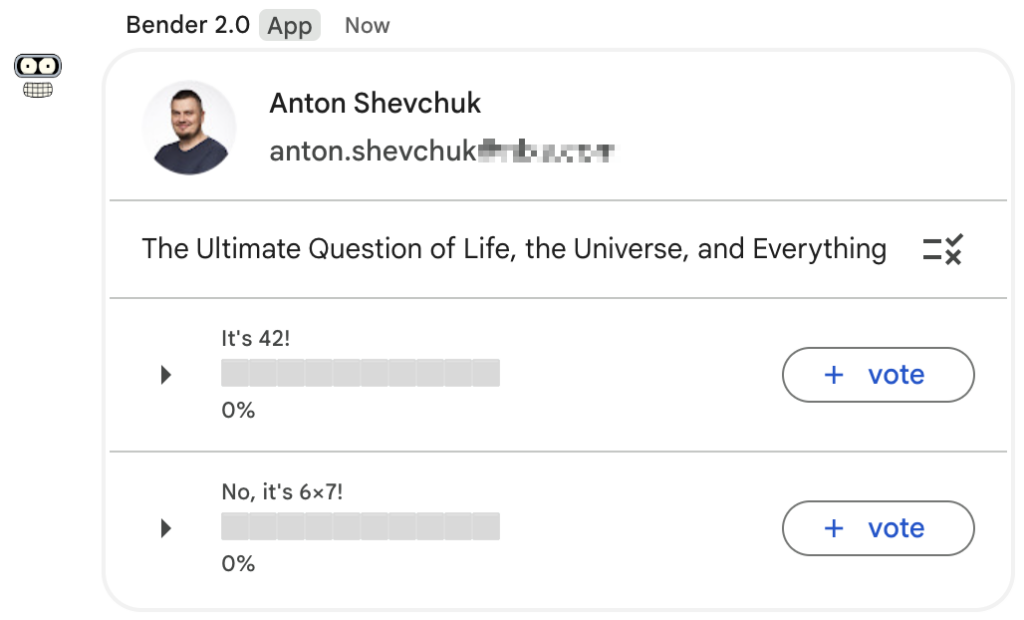
Повернемось на попередній крок, та додамо до функції actionNewPoll() виклик іншої функції — cardPoll():
/**
 * @param {Object} event the event object from Google Chat
 */
function actionNewPoll(event) {
  const formHandler = new FormInputHandler(event)

  let data = {
    question: formHandler.getTextValue('question'),
    multi: formHandler.getBooleanValue('multi'),
    options: []
  }

  //
  // ... the code was cropped
  //

  return cardPoll(event, data)
}
Звісно реалізація cardPoll() буде у відповідному файлі:
/**
 * @param {Object} event the event object from Google Chat
 * @param {Object} data the data from the request
 *
 * @return {Object} the card object
 */
function cardPoll(event, data) {
  let card = {
    'actionResponse': {
      'type': 'NEW_MESSAGE',
    },
    "cardsV2": [
      {
        "cardId": "poll",
        "card": {
          "header": {
            "title": event.user.displayName,
            "subtitle": event.user.email,
            "imageUrl": event.user.avatarUrl,
            "imageType": "CIRCLE"
          },
          "sections": []
        }
      }
    ]
  }

  let sections = [];

  sections.push({
    "widgets": [
      {
        "decoratedText": {
          "text": data.question,
          "endIcon": {
            "materialIcon": {
              "name": data.multi ? "checklist_rtl" : "rule"
            }
          }
        }
      }
    ]
  })

  for (let i = 0; i < data.options.length; i++) {
    sections.push({
      "collapsible": true,
      "uncollapsibleWidgetsCount": 1,
      "widgets": [
        {
          "decoratedText": {
            "startIcon": {
              "materialIcon": {
                "name": "arrow_right"
              }
            },
            "topLabel": data.options[i],
            "text": "⬜️⬜️⬜️⬜️⬜️⬜️⬜️⬜️⬜️⬜️",
            "bottomLabel": "0%",
            "button": {
              "text": "vote",
              "icon": {
                "materialIcon": {
                  "name": "add"
                }
              },
              "altText": "Vote",
              "onClick": {
                "action": {
                  "function": "actionVotePoll",
                  "parameters": [
                    {
                      "key": "option",
                      "value": `${i+1}`
                    }
                  ]
                }
              }
            }
          }
        }
      ]
    })
  }

  card.cardsV2[0].card.sections = sections

  return card
}
Тут з основного — додано виклик функції actionVotePoll() у action кнопки, і про неї розповім далі.
Оновлення картки
Для початку звісно знов повернемося до onCardClick(), та додамо підтримку та виклик функції actionVotePoll():
/**
 * Responds to a CARD_CLICKED event in Google Chat.
 *
 * @param {Object} event the event object from Google Chat
 */
function onCardClick(event) {
  switch (event.common.invokedFunction) {

    //
    // ... the code was cropped
    //

    // - /poll
    case 'actionNewPoll':
      return actionNewPoll(event)
    case 'actionVotePoll':
      return actionVotePoll(event)
  }
}
Далі будемо створювати вже саму функцію у файлі actionVotePoll.gs:
/**
 * @param {Object} event the event object from Google Chat
 */
function actionVotePoll(event) {

  let parameters = event.common.parameters

  let card = event.message.cardsV2[0]

  //
  // ... the code was cropped
  //


}
Давайте поступово — окрім параметрів функції (рядок 6) нас загалом цікавить уся картка яка в нас є у чаті (рядок 8).
А тепер ключовий момент — ми можемо оновити картку у чаті після того як користувач буде взаємодіяти з нею:
/**
 * @param {Object} event the event object from Google Chat
 */
function actionVotePoll(event) {

  let parameters = event.common.parameters

  let card = event.message.cardsV2[0]

  //
  // ... the code was cropped
  //

  return {
    "actionResponse": {
      "type": "UPDATE_MESSAGE",
    },
    "cardsV2": [ card ]
  }
}
Використовуючи цю можливість можна зберігати голоси користувачів як частину картки:
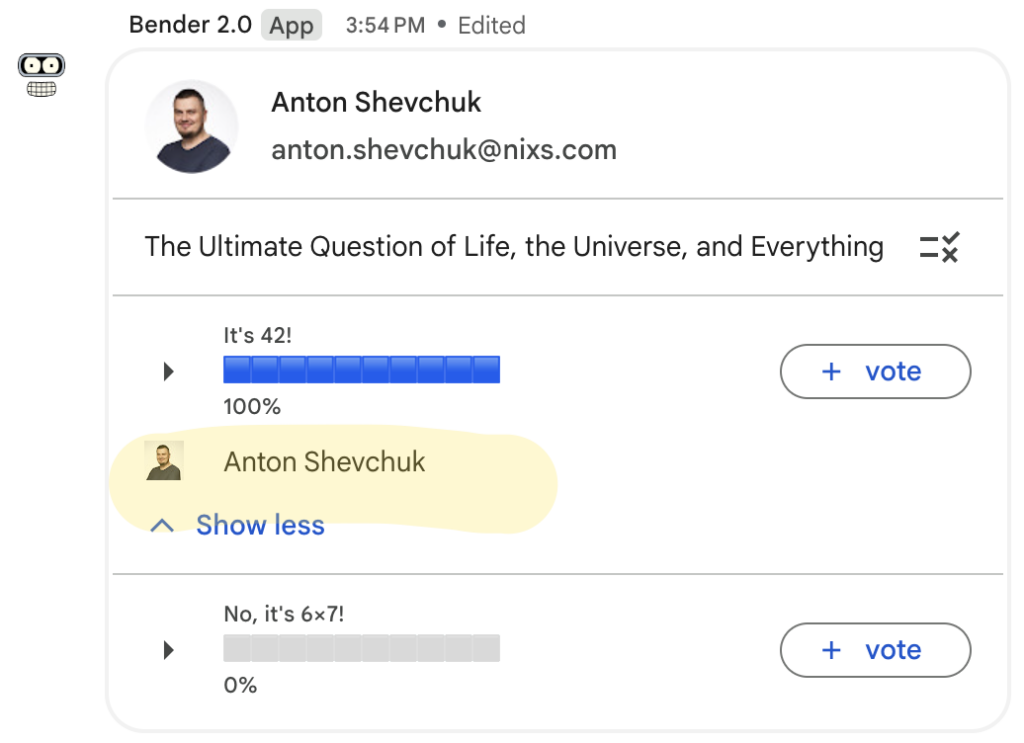
Cards are usually displayed below the text body of a Chat message, but can situationally appear other places, such as dialogs. Each card can have a maximum size of 32 KB.
Тож залишилось лише реалізувати цю логіку:
/**
 * @param {Object} event the event object from Google Chat
 */
function actionVotePoll(event) {

  let parameters = event.common.parameters

  let sections = event.message.cardsV2[0].card.sections

  let multi = sections[0].widgets[0].decoratedText.endIcon.materialIcon.name === "checklist_rtl"

  let option = parseInt(parameters.option)

  let user = event.user.displayName
  let avatar = event.user.avatarUrl

  let widget = {
    "decoratedText": {
      "startIcon": {
        "iconUrl": avatar
      },
      "text": user,
    }
  }

  let votes = []

  for (let i = 1; i < sections.length; i++) {
    let widgets = sections[i].widgets
    let people = []

    if (widgets.length > 1) {
      for (let j = 1; j < widgets.length; j++) {
        people.push(
          widgets[j].decoratedText.text
        )
      }
    }

    votes[i] = people.filter(n => n)

    Logger.log(`Votes for "${i}": ${votes[i].length}`, votes[i])
  }

  // update votes
  let index = votes[option].indexOf(user)
  if (index === -1) {
    Logger.log(`+1 vote for ${option}`)
    votes[option].push(user)
    sections[option].widgets.push(widget)
  } else {
    Logger.log(`-1 vote for ${option}, index is ${index}`)
    votes[option].splice(index, 1);
    sections[option].widgets.splice(index + 1, 1)
  }

  // for non-multi voting poll
  // remove user votes for another options
  if (!multi) {
    for (let i = 1; i < sections.length; i++) {
      if (i === option) {
        continue
      }
      let index = votes[i].indexOf(user)
      if (index !== -1) {
        Logger.log(`-1 vote for ${i}, index is ${index}`)
        votes[i].splice(index, 1)
        sections[i].widgets.splice(index + 1, 1)
      }
    }
  }

  Logger.log(`Vote for "${option}": ${votes[option].length}`, votes[option])

  // removed empty value from position 0
  votes.shift()

  let percentages = calculatePercentages(votes)

  Logger.log(`%:`, percentages)

  for (let i = 1; i < sections.length; i++) {
    sections[i].widgets[0].decoratedText.text = fillProgressBar(percentages[i - 1])
    sections[i].widgets[0].decoratedText.bottomLabel = `${percentages[i - 1]}%`
  }

  return {
    "actionResponse": {
      "type": "UPDATE_MESSAGE",
    },
    "cardsV2": [
      {
        "cardId": "poll",
        "card": {
          "header": event.message.cardsV2[0].card.header,
          "sections": sections
        }
      }
    ]
  }
}

/**
 * @param {Array} data
 */
function calculatePercentages(data) {
  // Flatten the array by concatenating all sub-arrays
  let flattenedArray = [].concat.apply([], data);

  // Calculate total number of items across all sub-arrays
  let totalItems = flattenedArray.length

  // Filter out duplicates by using a temporary object where properties represent the unique items found so far
  let uniqueItems = flattenedArray.filter(function(item, index, self) {
    return self.indexOf(item) === index;
  });

  let totalUniqueItems = uniqueItems.length;

  // Calculate the percentage of each subarray based on the total items
  return data.map(function (sublist) {
    return totalUniqueItems ? Math.round(sublist.length / totalUniqueItems * 100) : 0;
  });
}

/**
 * @param {Number} percentage
 */
function fillProgressBar(percentage) {
  let totalBoxes = 10; // Total number of boxes in the text
  let filledBoxes = Math.round(percentage / 10); // Calculate number of filled boxes (each box represents 10%)
  let progressBar = ""; // Initialize an empty string for the progress bar

  // Build the progress bar string
  for (let i = 0; i < totalBoxes; i++) {
    if (i < filledBoxes) {
      progressBar += ""; // Add a filled box for each 10% completed
    } else {
      progressBar += "⬜️"; // Fill the rest with empty boxes
    }
  }

  return progressBar;
}
У цьому коді для зберігання голосів використовуються віджети, тож кожна опція — це окрема секція, кожен голос — окремий віджет. Коли користувач голосує, то ми отримуємо всю картку, розібравши її на частинки можна відновити результати голосування та внести зміни.
Діаграма послідовності
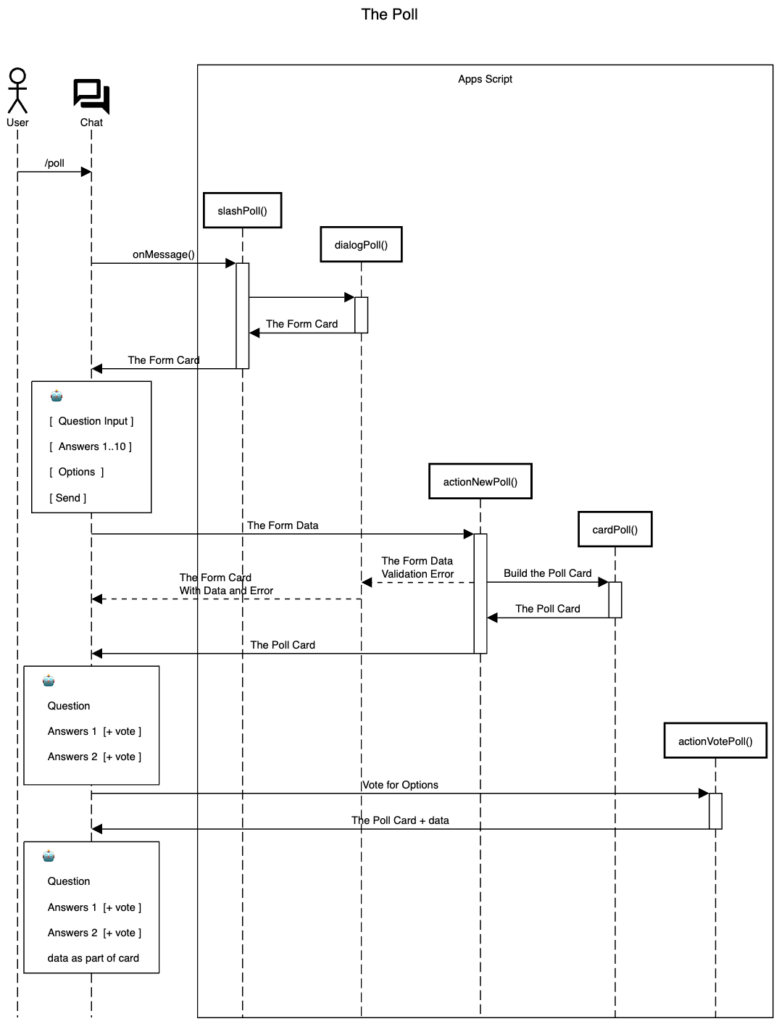
Хотів привести діаграму послідовності, можливо вона допоможе вам краще розібратися у функціоналі:
title The Poll

actor User

materialdesignicons F0822 "Chat" as C


participantgroup Apps Script
participant slashPoll()
participant dialogPoll()
participant actionNewPoll()
participant cardPoll()
participant actionVotePoll()
end

User->C: /poll


create slashPoll()

C->slashPoll(): onMessage()
activate slashPoll()
space -6
create dialogPoll()
slashPoll()->dialogPoll():
activate dialogPoll()
dialogPoll()->slashPoll(): The Form Card
deactivate dialogPoll()
slashPoll()->C: The Form Card
deactivate slashPoll()

space -2
box over C:\n\n[  Question Input ]\n\n[  Answers 1..10 ]\n\n[  Options  ]\n\n[ Send ]

space -7
create actionNewPoll()
C->actionNewPoll(): The Form Data
activate actionNewPoll()
actionNewPoll()-->dialogPoll(): The Form Data\nValidation Error
space -4
dialogPoll()-->C: The Form Card\nWith Data and Error

space -10
create cardPoll()
actionNewPoll()->cardPoll(): Build the Poll Card
activate cardPoll()
cardPoll()->actionNewPoll(): The Poll Card
deactivate cardPoll()

actionNewPoll()->C: The Poll Card

deactivate actionNewPoll()

space -2
box over C:\n\n  Question  \n\n  Answers 1  [+ vote ]\n\n  Answers 2  [+ vote ]\n

space -8
create actionVotePoll()

C->actionVotePoll(): Vote for Options
activate actionVotePoll()
actionVotePoll()->C: The Poll Card + data
deactivate actionVotePoll()


space -2
box over C:\n\n  Question  \n\n  Answers 1  [+ vote ]\n\n  Answers 2  [+ vote ]\n\n  data as part of card
Source Code
Код бота доступний на GitHub, реліз 5.1.0 відповідає коду з цієї статті.

P.S.
З початку був реліз 5.0.0, але я потім подивився на той код, та вирішив навести в ньому лад, саме тому краще дивитися версію 5.1.0 :)
