
Статті для початківців закінчились, настав час розробки «дорослого» функціоналу. В цій статті ми будемо додавати до нашого бота інтеграцію з Jira.
З початку розповім свій задум: я хочу додати до бота можливість створення тасків та репорту помилок до обраного проєкту у Jira, усі апдейти з Jira повинні прилітати назад до нашого чату, бо користувачі повинні бачити що відбувається з issue у Jira.
Як це буде працювати:
- користувач нашого бота викликає slash-команду
/task - заповнює форму для таска у Jira
- данні з форми летять до Jira, де ми створюємо відповідний issue
- до чату відправляємо картку з посиланням на Jira issue
- отримавши посилання на тред у чаті, додаємо його до Jira issue
Діалог
Все знов починається з додавання slash-команди до нашого боту, нагадую, що для цього нам треба перейти до налаштувань Google Chat API.

Ми вже створювали діалоги, тож не забудьте поставити позначку ✅ Opens a dialog.
Зміни до onMessage() теж не складні, нам треба лише піймати нову команду з ID 12:
/**
 * Responds to a MESSAGE event in Google Chat.
 *
 * @param {Object} event the event object from Google Chat
 */
function onMessage(event) {
  if (event.message.slashCommand) {
    // Checks for the presence of event.message.slashCommand
    // The ID for your slash command
    switch (event.message.slashCommand.commandId) {
      case 1:
        return slashHelp(event)
      case 10:
        return slashBender(event)
      case 11:
        return slashWhisky(event)
      case 12:
        return slashTask(event)
      case 20:
        return slashCard(event)
      case 21:
        return slashNotes(event)
      case 22:
        return slashPoll(event)
    }
  } else {
    // If the Chat app doesn't detect a slash command
    // ...
  }
}
Створимо функцію slashTask() у відповідному файлі:
/**
 * Opens a dialog in Google Chat.
 *
 * @param {Object} event the event object from Chat API.
 *
 * @return {object} open a Dialog in Google Chat.
 */
function slashTask(event) {
  // nothing for now
  return dialogIssue(event)
}
Тут лише виклик dialogIssue(), тож перейдемо до відповідного dialogIssue.gs. Я відразу приведу код з обробкою помилок, бо у попередній частині ми вже детально розбирали як те робиться, а повторюватися мені ліньки:
/**
 * Create a dialog for Google Chat.
 *
 * @param {Object} event the event object from Chat API.
 * @param {Object} request the data from the form or from parameters.
 * @param {String} type the type of issue
 * @return {object} open a Dialog in Google Chat.
 */
function dialogIssue(event, request = null, type = "Task") {
  let card = {
    "action_response": {
      "type": RESPONSE_TYPE_DIALOG,
      "dialog_action": {
        "dialog": {
          "body": {
            "sections": [
              {
                "widgets": []
              }
            ],
            "name": `New ${type}`,
            "fixedFooter": {
              "primaryButton": {
                "text": "Create",
                "onClick": {
                  "action": {
                    "function": "actionNewIssue",
                    "parameters": [
                      {
                        "key": "type",
                        "value": type
                      }
                    ]
                  }
                }
              }
            }
          }
        }
      }
    }
  }

  if (request && !request.summary) {
    card.action_response.dialog_action.dialog.body.sections[0].widgets.push({
        "textParagraph": {
          "text": "<font color='#c1121f'>The summary is required</font>"
        }
      }
    )
  }

  card.action_response.dialog_action.dialog.body.sections[0].widgets.push(
    {
      "textInput": {
        "label": "Summary*",
        "type": "SINGLE_LINE",
        "name": "summary",
        "hintText": "",
        "value": request ? request.summary : ""
      }
    }
  )

  if (request && !request.description) {
    card.action_response.dialog_action.dialog.body.sections[0].widgets.push({
        "textParagraph": {
          "text": "<font color='#c1121f'>The description is required</font>"
        }
      }
    )
  }

  card.action_response.dialog_action.dialog.body.sections[0].widgets.push(
    {
      "textInput": {
        "label": "Description*",
        "type": "MULTIPLE_LINE",
        "name": "description",
        "hintText": "",
        "value": request ? request.description : ""
      }
    }
  )

  card.action_response.dialog_action.dialog.body.sections[0].widgets.push({
      "textParagraph": {
        "text": "<font color='#c1121f'>*</font> - all fields are required."
      }
    }
  )

  return card
}
Тут я додав ще аргумент
type, бо ми не тільки таски будемо створювати, а й репортити про помилки.
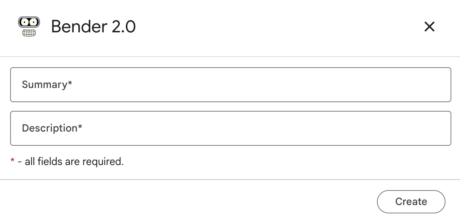
Після цього ви вже можете користуватися командою /task, та отримаєте наступний діалог:
Відправка ще не буде працювати, треба додати до onCardClick() підтримку нового action actionNewIssue:
/**
 * Responds to a CARD_CLICKED event in Google Chat.
 *
 * @param {Object} event the event object from Google Chat
 */
function onCardClick(event) {
  switch (event.common.invokedFunction) {
    //
    // ... the code was cropped
    //
    // - /task
    case 'actionNewIssue':
      return actionNewIssue(event)
  }
}
Відповідний функціонал actionNewIssue.gs ми будемо роздивлятися по частинам.
Частина перша — валідація даних:
/**
 * @param {Object} event the event object from Google Chat
 */
function actionNewIssue(event) {

  const parameters = event.common.parameters
  const formHandler = new FormInputHandler(event)

  const summary = formHandler.getTextValue('summary')
  const description = formHandler.getTextValue('description')
  const type = parameters.type

  // validation
  if (!summary.length || !description.length) {
    return dialogIssue(event, { summary, description })
  }

  //
  // ... the code was cropped
  //
}
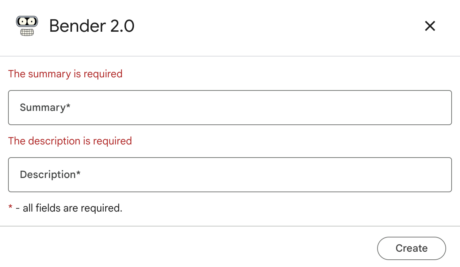
Тут в нас лише перевірка на те що поля не пусті, та у випадку помилки, ми повертаємо картку з dialogIssue() з текстом помилок:
Ви можете додати більш складні перевірки до коду, дійте на свій розсуд
Далі нам вже треба працювати з Jira, але вона ще не готова :)
Підготовка Jira проєкту
Для початку, нам потрібен JIRA проєкт, та краще окремий користувач для нашого бота, у проєкті йому треба буде надати адмінські права:

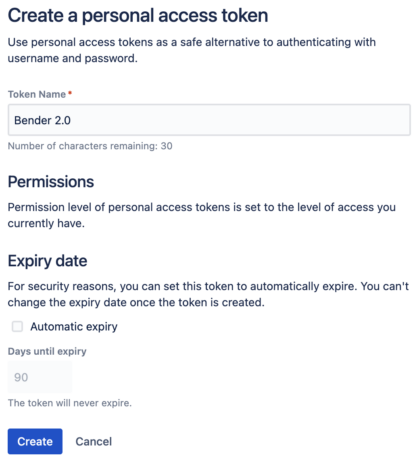
А ще треба створити персональний Access Token для вашого користувача:
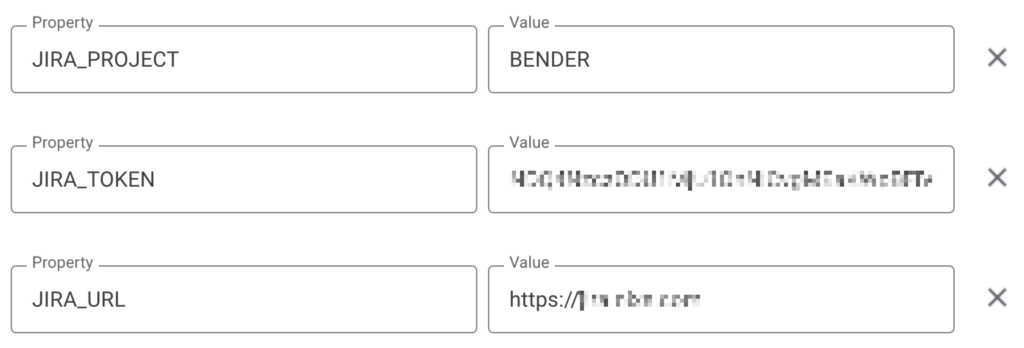
Access Token який ви отримаєте слід зберегти у Properties вашого бота, туди також слід додати посилання на Jira та ключ вашого проєкту:
А тепер увага, для того, щоб у вашому issue зберігалось посилання на відповідне повідомлення у Google Chat слід додати Custom Field, типу URL до потрібних Screens у вашому проєкті. Якщо ви не розумієте про що мова — попросіть вашого адміністратора Jira зробити це. Screen мого проєкту у Jira виглядає наступним чином:
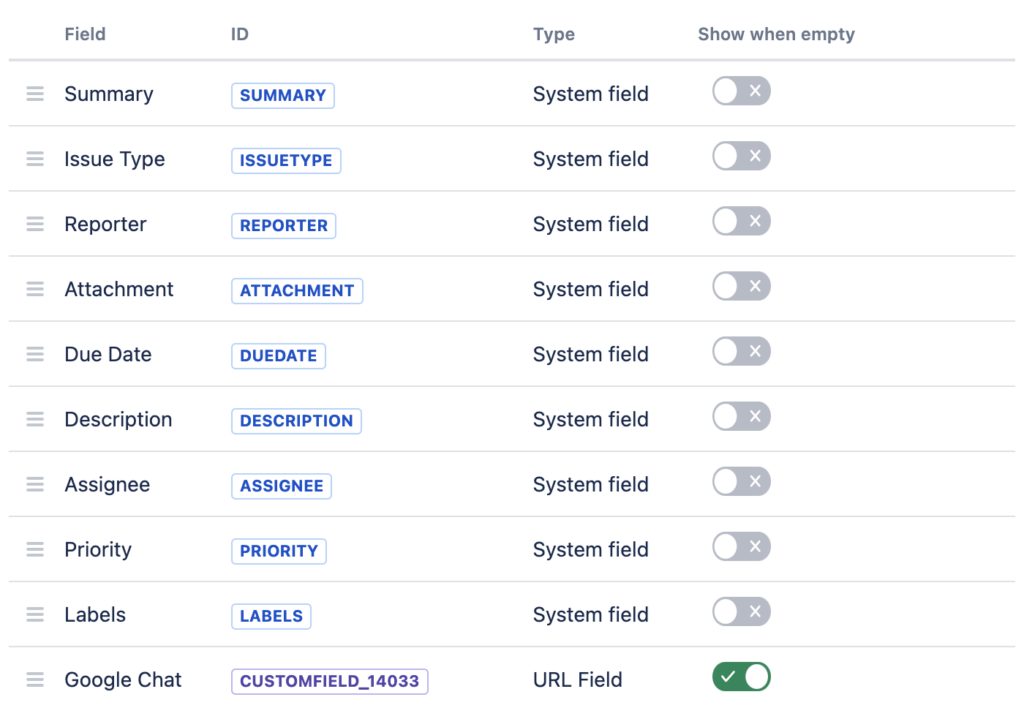
Ідентифікатор новоствореного Custom Field я також додаю до Properties:

Створення Issue
Так, Jira готова, додамо класс для взаємодією з нею, та створимо той issue:
/**
 * Class for working with JIRA API v2
 *
 * @link https://developer.atlassian.com/cloud/jira/platform/rest/v2/intro/
 */
class JiraAPI {
  constructor() {
    const scriptProperties = PropertiesService.getScriptProperties();
    this.baseUrl = scriptProperties.getProperty('JIRA_URL');
    this.token = scriptProperties.getProperty('JIRA_TOKEN');
    this.project = scriptProperties.getProperty('JIRA_PROJECT');
    this.customField = scriptProperties.getProperty('JIRA_CUSTOM_FIELD');
    this.options = {
      headers: {
        "Authorization": "Bearer " + this.token,
        "Content-Type": "application/json"
      },
      muteHttpExceptions: true // Set to false to throw exceptions for HTTP errors
    }
  }

  /**
   * Makes a HTTP request to the JIRA API with error handling.
   *
   * @param {String} endpoint - The API endpoint.
   * @param {Object} options - The options for the fetch call, including method, headers, and payload.
   * @return {Object} The JSON response from the JIRA API.
   */
  fetch(endpoint, options) {
    const url = `${this.baseUrl}${endpoint}`;

    Logger.log(url)
    Logger.log(options)

    try {
      const response = UrlFetchApp.fetch(url, Object.assign({}, options, this.options));
      const responseCode = response.getResponseCode()
      const contentText = response.getContentText()
      const contentType = response.getHeaders()['Content-Type']

      Logger.log(`Response code: ${responseCode}`)
      Logger.log(`Content type: ${contentType}`)

      if (responseCode >= 200 && responseCode < 300) {
        // it strange, FIXME
        if (contentText.length && contentType.search('application/json') !== -1) {
          return JSON.parse(contentText)
        } else {
          return response.getResponseCode()
        }
      } else {
        console.error(`JIRA API request to ${endpoint} failed with code: ${responseCode}, response: ${contentText}`);
        throw new Error(`Request failed with code: ${responseCode}`);
      }
    } catch (e) {
      console.error(`Error making request to JIRA API: ${e}`);
      throw e; // Rethrow the error after logging
    }
  }

  /**
   * Retrieves details of an issue from JIRA.
   *
   * @param {String} issueIdOrKey - The ID or key of the issue
   */
  getIssue(issueIdOrKey) {
    return this.fetch(`/rest/api/2/issue/${issueIdOrKey}`, {
      "method": "get"
    });
  }

  /**
   * Creates a new issue in JIRA.
   *
   * @param {Object} issueData
   */
  createIssue(issueData) {
    return this.fetch("/rest/api/2/issue", {
      "method": "post",
      "payload": JSON.stringify(issueData)
    });
  }

  /**
   * Updates an issue in JIRA.
   *
   * @param {String} issueIdOrKey - The ID or key of the issue
   * @param {Object} issueData
   */
  updateIssue(issueIdOrKey, issueData) {
    return this.fetch(`/rest/api/2/issue/${issueIdOrKey}`, {
      "method": "put",
      "payload": JSON.stringify(issueData)
    });
  }
}
Цей клас вміє не так багато, але нам цього вистачить:
getIssue()— отримати issue по ключу або ідентифікаторуcreateIssue()— створити issueupdateIssue()— оновити issue по ключу або ідентифікатору
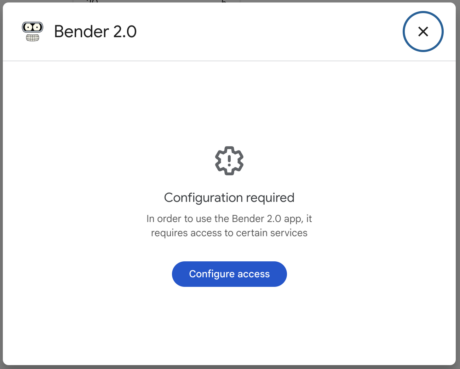
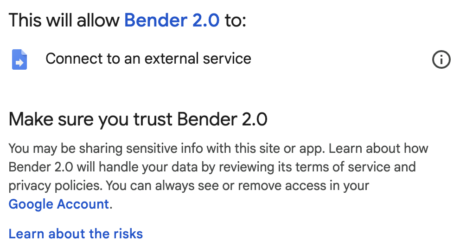
⚠️ Після додавання цього коду, ваш бот буде питати користувачів дозвіл на відправку запитів на сторонні ресурси:
Давайте продовжимо роботу над actionNewIssue.gs. Додамо другу частину до нашого пазлу — створення issue:
/**
 * @param {Object} event the event object from Google Chat
 */
function actionNewIssue(event) {
  //
  // ... the code was cropped
  //

  Logger.log(`New Issue: ${summary}`)

  const jiraApi = new JiraAPI()

  let issueData = {
    "fields": {
      "project": { "key": jiraApi.project },
      "summary": summary,
      "description": googleChatToJira(description),
      "issuetype": { "name": type },
      "reporter": { "name": event.user.email },
      "assignee": null,
    }
  };

  const response = jiraApi.createIssue(issueData);

  Logger.log(`The Issue Key is "${response.key}"`)

  const issue = jiraApi.getIssue(response.key)

  //
  // ... the code was cropped
  //
}
Коли ми створюємо іssue (рядок 24), то Jira повертає не весь issue у відповідь, тому щоб отримати все що нам потрібно ми робимо ще один запит до Jira API (рядок 28).
Наш наступний крок — то сформувати картку та відправити її до чату. За формування картки буде відповідати функція cardIssue():
/**
 * Create a card for Google Chat.
 *
 * @param {Object} event the event object from Google Chat
 * @param {Object} issue the JIRA issue
 *
 * @return {Object} the card object
 */
function cardIssue(event, issue) {

  const scriptProperties = PropertiesService.getScriptProperties();
  const jiraUrl = scriptProperties.getProperty('JIRA_URL')
  const jiraIssueUrl = `${jiraUrl}/browse/${issue.key}`

  Logger.log(`The URL to Issue is ${jiraIssueUrl}`)

  let card = {
    "cardsV2": [
      {
        "cardId": "presale-request",
        "card": {
          "sections": [
            {
              "widgets": [
                {
                  "decoratedText": {
                    "icon": {
                      // "iconUrl": issue.fields.issuetype.iconUrl
                      "materialIcon": {
                        "name": issue.fields.issuetype.name === "Task" ? "task" : "bug_report"
                      }
                    },
                    "text": issue.fields.summary,
                  }
                },
                {
                  "textParagraph": {
                    "text": jiraToGoogleChat(issue.fields.description)
                  }
                }
              ]
            },
            {
              "widgets": [
                {
                  "buttonList": {
                    "buttons": [
                      {
                        "text": "JIRA",
                        "color": {
                          "red": 0.75,
                          "green": 0.85,
                          "blue": 0.95,
                          "alpha": 1
                        },
                        "icon": {
                          "materialIcon": {
                            "name": "task"
                          }
                        },
                        "onClick": {
                          "openLink": {
                            "url": jiraIssueUrl
                          }
                        }
                      }
                    ]
                  }
                }
              ]
            },
            {
              "widgets": [
                {
                  "columns": {
                    "columnItems": [
                      {
                        "widgets": [
                          {
                            "decoratedText": {
                              "icon": {
                                "iconUrl": issue.fields.status.iconUrl
                              },
                              "topLabel": "Status",
                              "text": issue.fields.status.name,
                              "bottomLabel": "",
                            }
                          }

                        ]
                      },
                      {
                        "widgets": [
                          {
                            "decoratedText": {
                              "icon": {
                                "knownIcon": "PERSON"
                                // "iconUrl": issue.fields.assignee.avatarUrls["48x48"]
                              },
                              "topLabel": "Assigned",
                              "text": issue.fields.assignee ? issue.fields.assignee.displayName : 'Unassigned',
                              "bottomLabel": issue.fields.assignee ? issue.fields.assignee.emailAddress : '',
                            }
                          }
                        ]
                      }
                    ]
                  }
                }
              ]
            }
          ]
        }
      }
    ]
  }

  // we have the event if a user works with chat
  if (event) {
    card.cardsV2[0].card["header"] = {
      "title": event.user.displayName,
      "subtitle": event.user.email,
      "imageUrl": event.user.avatarUrl,
      "imageType": "CIRCLE"
    }

    card.cardsV2[0].card["sections"].push(
      {
        "widgets": [
          {
            "decoratedText": {
              "icon": {
                "knownIcon": "CLOCK"
              },
              "text": new Date().toLocaleString(),
            }
          }
        ]
      }
    )
  }

  return card
}
Далі буде ще складніше, нам треба відправити підготовлену картку до чату за допомоги API, бо таким чином, ми можемо отримати ідентифікатор повідомлення та зберегти його до issue у Jira (так, до того custom field). Але це не так просто зробити.
Chat API
Нашим наступним кроком буде додавання до проєкту сервіса Chats API, тож поверніться до нашого редактора коду, та жміть «+» напроти Services:
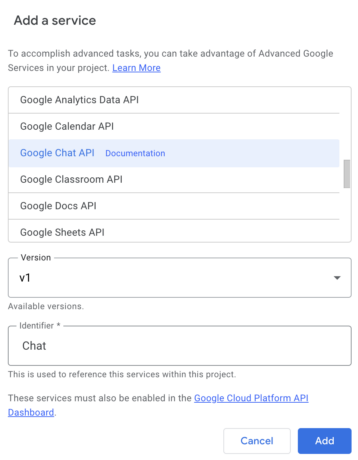
Оберіть та додайте Google Chat API (документація до API доступна на сторінці https://developers.google.com/apps-script/advanced/chat).
Тепер в нас з’явиться можливість відправляти до чату повідомлення:
Chat.Spaces.Messages.create(
  {'text': 'Hello world!'},
  event.space.name
);
Хоча, ні, ви отримаєте помилку:
GoogleJsonResponseException: API call to chat.spaces.messages.create failed with error: Request had insufficient authentication scopes.
Треба ще додати відповідний скоуп до appssript.json:
{
  "oauthScopes": ["https://www.googleapis.com/auth/chat.messages.create"],
}
Тепер все буде працювати, звісно у користувача бот запитає потрібні дозволи, щоб писати щось у чат, та все ж таки результат буде:

У коді, ви отримаєте відповідь від API:
{
  name: 'spaces/AAAABBBB/messages/QWERTY.QWERTY',
  argumentText: 'Hello world!',
  text: 'Hello world!',
  sender: { type: 'HUMAN', name: 'users/111111234567890000000' },
  createTime: '2024-04-27T21:58:02.427887Z',
  space: { name: 'spaces/AAAABBBB' },
  formattedText: 'Hello world!',
  thread: { name: 'spaces/AAAABBBB/threads/QWERTY' }
}
Тож вже можна посилання на тред закинути до Jira. Повертаємось до редагування actionNewIssue.gs:
/**
 * @param {Object} event the event object from Google Chat
 */
function actionNewIssue(event) {
  //
  // ... the code was cropped
  //

  try {
    const card = cardIssue(event, issue)

    const message = Chat.Spaces.Messages.create(card, event.space.name);

    // Extracting the thread name from the response
    // Assuming ID is spaces/AAAAAAAA/threads/BBBBBBBB
    const [ , spaceId, , threadAndMessageId] = message.thread.name.split('/');

    const threadUrl = `https://chat.google.com/room/${spaceId}/${threadAndMessageId}/${threadAndMessageId}`;

    Logger.log(`New thread ${threadUrl}`)

    let updateData = {
      "fields": {}
    }

    updateData.fields[jiraApi.customField] = threadUrl

    jiraApi.updateIssue(response.key, updateData)
  } catch (err) {
    Logger.log('Failed to create message with error %s', err.message);
  }

  return OK()
}
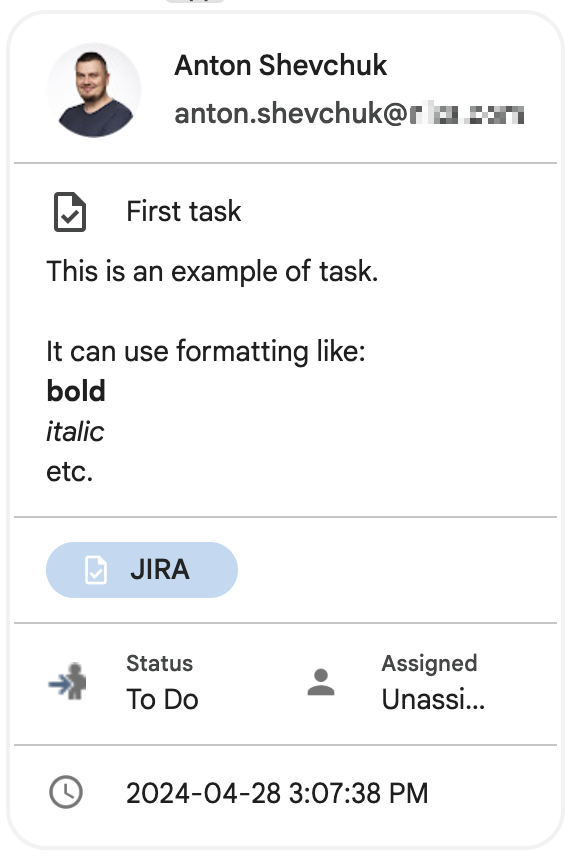
Спробуємо створити таск використовуючи команду /task та отримаємо у чаті наступну картку:
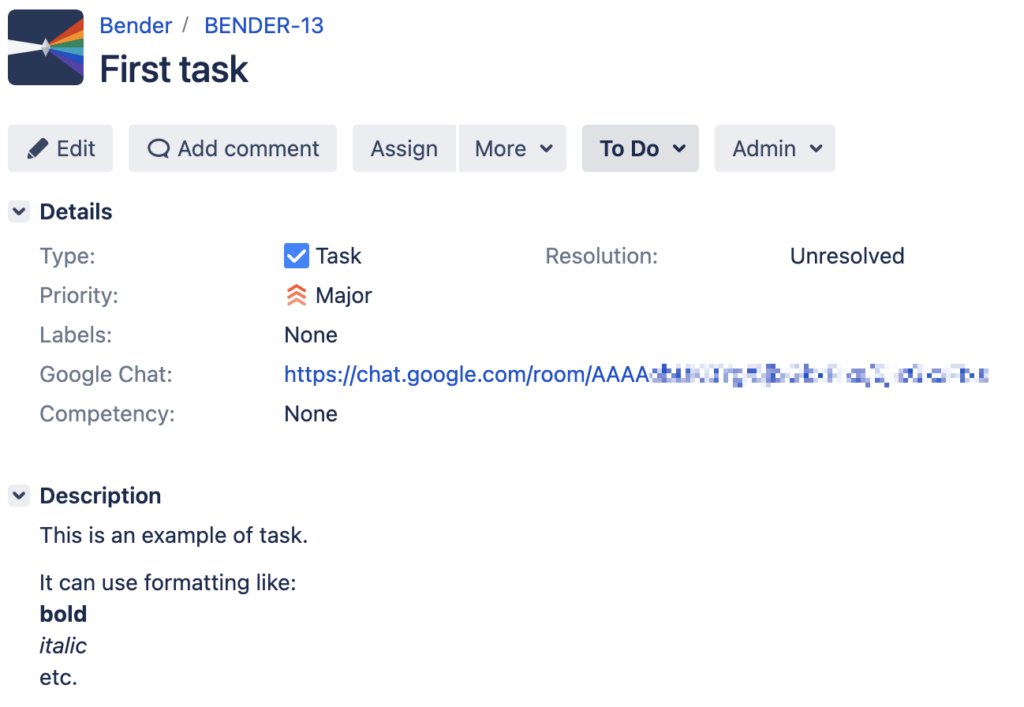
В Jira буде створено відповідний issue:
І це вже непоганий результат. Мені подобається що в нас виходить.
Діаграма послідовності
Приведу ще діаграму послідовності, вона наче не складна вийшла:
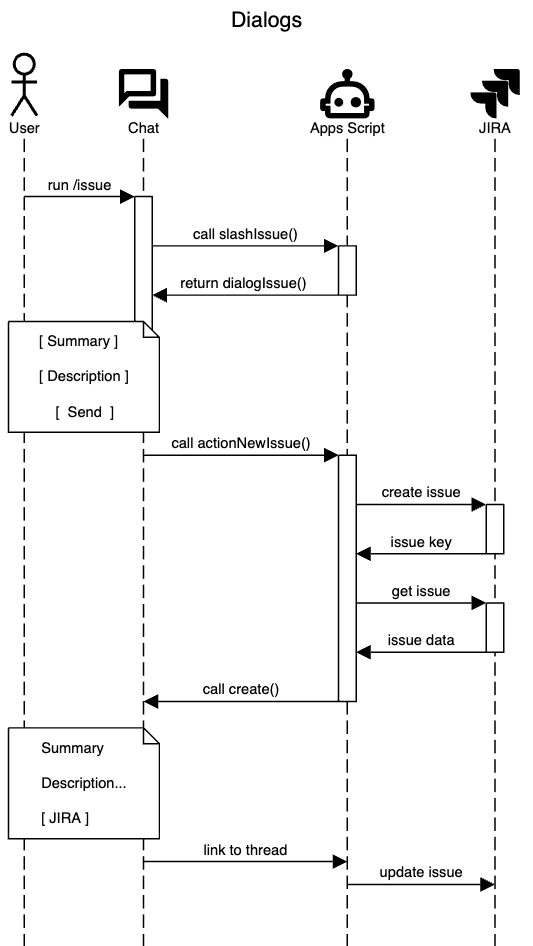
#
# https://sequencediagram.org/
#
title Dialogs

actor "User" as U
materialdesignicons F0822 "Chat" as C
materialdesignicons F167A "Apps Script" as S
materialdesignicons F0303 "JIRA" as J

U->C:run /issue
activate C
C->S:call slashIssue()
activate S
S->C:return dialogIssue()
deactivate S
note over U,C: [ Summary ]\n\n[ Description ]\n\n    [  Send  ]
deactivate C

space -3
C->S:call actionNewIssue()
activate S
S->J: create issue
activate J
J->S: issue key
deactivate J
S->J: get issue
activate J
J->S: issue data
deactivate J
S->C: call create()
deactivate S

note over U,C: Summary\n\nDescription...\n\n[ JIRA ]

space -3
C->S: link to thread
space -3
S->J: update issue
Тож на цьому першу частину я вважаю можна завершувати, але це ще не весь функціонал який я хотів реалізувати, але можливо вам його вистачить.
One thought on “Google Chat Bot. Інтеграція з Jira. Частина I”